Hashtags generation and image QA with Watson AI
I've been using Instagram for some years, mainly to showcase my running workouts and travel photos. As a UX professional, and with the experience acquired in more than 800 posts on my Instagram account, I could write about the degradation of Instagram's experience with each functionality they add, but for this article I will focus on another topic: hashtags!
For my running and travels photos, I have a set of hashtags on Google Keep, that I copy and paste with each post. For running, I have tags like #instarunners or #nikeplusrunners, and for travels I use terms like #places_wow, #splendid_earth and tags that describe that place. Each time I do this task, a question keeps popping on my mind: "Why can't Instagram suggest hashtags for me?". With this in mind, I turned once again to IBM Watson services, more specifically to Watson Visual Recognition. This service uses machine learning to understand the contents of images and analyses them for scenes, objects, faces, colors, food, text and other subjects you train, so, what if I used this service to "read" my photos and suggest hashtags?
To start, I wanted to see what kind of information Visual Recognition returns, so I went to the service demo page and pasted the URL to one of my pictures, showcasing the beautiful Belém Tower.

As a starting point, the results are pretty impressive. The general model correctly identified terms that could be suggested to the user as hashtags, but I want it to be more specific. Could I teach it to properly identify Belém Tower or other monuments?
Let's start by setting up the IBM Watson service:
- On the Visual Recognition page, sign up for a free Bluemix account or log in.
- Go to the service creation page, name the service, choose the lite (free) pricing plan (which is enough for this proof of concept) and press "Create".
- Click on the "Launch Tool" button.
- If everything is right, by now you'll be on the models screen, where you can test the default models (general, faces, food, explicit and text) or create a custom model.
- Press "Create Model".
- To use this option you need a project on IBM Watson Studio, so fill the name of the project and click "Create".
Now we are ready to create our custom model. For this exercise, I will train Visual Recognition to identify Belém Tower and Pena Palace, two of the most iconic Portuguese monuments. For that purpose, I created a class for each one. You should have something like this:

To create a new multi-faceted model, you need to upload example images for each class. The minimum for each class is 10 images, but IBM recommends 100s or 1000s of images for better performance and accuracy. You can read more about the training best practices here. I didn't want to spend too much time on this step, so collected 30 images (free for non-commercial use) from each monument on Google. If needed, I could add more images later.
It's also recommended to collect images for the negative class. Think of this class as the opposite of the classes you want to train. For example, if you wanted to train dog breeds, the negative class could be images from cats.
One misconception I had about visual recognition was that it needed high-resolution images, but I was wrong. IBM says images with as low as 320 pixels of width or height are enough, with the advantage that the learning process will be faster and you'll occupy less space on the cloud storage. This way, I resized all images to that size.
- Make a Zip file with the images for each monument and upload them to Watson on the right side of the page.
- Select the class and drag-and-drop the Zip file from the right bar to the page.
- Repeat the process for each class.

If everything is right, now you should be able to press the button "Train Model". Press it to start the learning process (yeah!). In this case, it took about 10 minutes.

Now comes the best part: Testing the model. On the training confirmation message, click on the link, and afterward on the "Test" tab. Drag-and-drop some images to the page and check the results:

The results are great! As you can see by the confidence score (between 0 and 1), Visual Recognition successfully identified Belem Tower and Pena Palace. A higher score indicates a greater likelihood that the class is depicted in the image. The default threshold for returning scores from a classifier is 0.5.
With the monuments model working, now it's time to auto hashtag our images. With a few lines of code on PHP I set up the service using two classifier ids, to get the default evaluation of Visual Recognition and my monuments model.
<?php

$api_url = 'https://gateway.watsonplatform.net/visual-recognition/api/v3/classify?version=2018-03-19';
$api_key = '{your Visual Recognition API key}';
$image_url = '{the URL of the image to analyse}';
$query = array(
	'url' => $image_url,
	'classifier_ids' => 'default,MonumentsModel_267905574' //insert here your classifiers Ids
);

$ch = curl_init();
curl_setopt($ch, CURLOPT_URL, $api_url);
curl_setopt($ch, CURLOPT_RETURNTRANSFER, 1);
curl_setopt($ch, CURLOPT_POST, 1); //POST
curl_setopt($ch, CURLOPT_USERPWD, 'apikey:'.$api_key);
curl_setopt($ch, CURLOPT_POSTFIELDS, $query);
$result = curl_exec($ch);
curl_close($ch);

$array = json_decode($result,true);
$alt = '';
$classScore = '';
$hashtags = '';

for($n=0;$n<2;$n++){
	foreach($array[images][0][classifiers][$n][classes] as $classes){
	  $alt .= ($classes['class'].', ');
	  $classScore .= $classes['class'].':'.number_format($classes['score'],2).'</br>';
	  $hashtags .= '#'.str_replace(' ', '', $classes['class']).' ';
	}
}
?>

<style>
    body{font-family:Helvetica,Arial,sans-serif;font-size:14px;}
    td{border: 1px solid grey;padding:10px;}
</style>
<table>
    <tbody>
        <tr>
            <td rowspan="0"><img width="100%" height="100%" src="<?php echo $image_url; ?>" alt="<?php echo substr($alt, 0, -2); ?>"/></td>
            <td style="vertical-align:top;text-align:right">
                <?php echo $classScore; ?>
            </td>
        </tr>
        <tr>
            <td style="width:250px;color: #003569;">
                <?php echo $hashtags; ?>
            </td>
        </tr>
    </tbody>
</table>
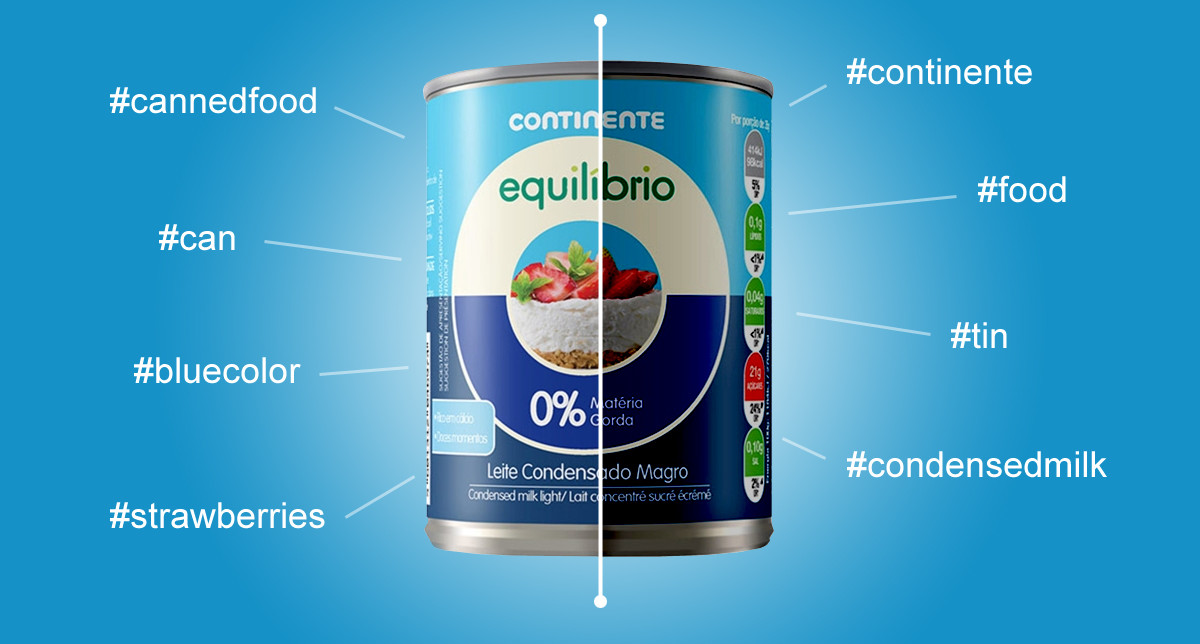
And the final result is this. All the terms with a minimum score of 0.50 are presented together with my model, which clearly identified Belem Tower. Bellow, you can see those terms like hashtags. Some of them may be debatable but remember these are merely suggestions that the user could accept or not.

Another use for these terms could be the Alt tag of the image, which is used to provide a text description of the image, e.g., for users with sight-impaired that use a screen reader.

The Continente Online use case
Our team has a commitment to quality and does its best to provide quality images and content to each product at Continente Online, but managing a catalog with tens of thousands of products its not an easy task. In rare cases, the image associated with a product does not comply with the quality standards, and that's where Watson Visual Recognition plays its role.
I started by identifying the variants in image quality (dark background or foreground, shadows, pixelated, no image...) and gathered examples of each one for the positive (on low quality) class. On the negative class picked examples of perfect images. Like on the monuments model, used only 30+ for each class.

The results are outstanding! Visual Recognition successfully recognized the low-quality images with a high level of confidence and even the image with our logo (that appears when a product hasn't got an image). This way, we can detect these situations much more efficiently and provide a better service to our customers.
Final thoughts
I hope this article has served to demonstrate the power of the IBM Watson Visual Recognition service. The setup is quite simple and with the default models, you can get results instantly (and in multiple languages). Even if there's a need for a custom model, as you could see by my example applications, the process is not complicated. Give it a try and send me your feedback.